
Done by @rhyspaku_tattoo who works in Australia!! This looks good enough to eat, thank you Rhys Paku…!
If you have a food tattoo or recipe you would like to share, send it to us at knivesandneedles@gmail.com or tag us @knivesandneedles
Cheers!!
Kitchen Techniques by Molly Kitamura
Done by @rhyspaku_tattoo who works in Australia!! This looks good enough to eat, thank you Rhys Paku…!
If you have a food tattoo or recipe you would like to share, send it to us at knivesandneedles@gmail.com or tag us @knivesandneedles
Cheers!!

We have no idea who did this tattoo, but it screams the Fourth of July! If anyone knows who did this, we would love to give credit where credit is due! Happy fourth and have a fun yet safe holiday today!!

Carrots are ancient, about 5,000 years ancient, originating from Egypt, Iran and Afghanistan. They spread through Africa, Arabia and Asia finally making it to Europe via ancient Greece and Rome of course. Carrots were originally grown for their fragrant flowers and leaves, not for their edible roots. You may not have recognized carrots in ancient times, as they were a variety of colors like yellow, purple, white, black, and red. Sometime in the 16th century, the Netherlands first started breeding the orange carrot (from red and yellow carrots) we know today in honor of the House of Orange, the national color for the Netherlands.
In ancient Greece carrots were not consumed as food, but used in medicines and as an aphrodisiac. They were eaten with olive oil in Rome and cultivated in Asia way before the Europeans.
In preparing carrots, scrub the skin instead of peeling it. Most of the nutritional value of the carrot is just below the skin, so peeling removes most of the health benefits. Also, this is a vegetable that you want to buy organic as the skin is very thin and you want to eat the skin.
Today, I am giving you all my carrot/ginger salad dressing. I learned it from my old master chef and I have used it for years. It is similar to the carrot/ginger dressing you probably find at your good ‘ol neighborhood sushi bar. This is just the fresh version, not the bottled one!
Carrot/Ginger Dressing
4-6 large carrots, grated
2-4 large pieces of ginger, grated
2 large yellow onions, grated
1c Ponzu
1c Light soy sauce
¼-½c Salad oil
For salad dressing
Grate the carrots, ginger and onion and add the ponzu and soy sauce. With a blender, slowly add the salad oil until everything is emulsified. Check taste and add more of any of the ingredients to taste.
Ponzu
1-1½ c Lemon/yuzu juice (Japanese citrus fruit)
1piece Konbu (its large, thick seaweed sized about 4-5”x2-4”), singed on the stove over an open flame
1c Light soy sauce
1c Tamari soy sauce
1 handful of Bonito flakes (shaved, dried bonito fish)
For ponzu
Singe the konbu over an open flame and immediately put all the ingredients together. Let it marinate for 2-3 days in the refrigerator. Should last up to 3 weeks.
Thank you and enjoy!!
Photo by Michelle Roberts
If you have a recipe or food tattoo, email us at
knivesandneedles@gmail.com

Herbs Part 4
Basil
Basil. Basil, basil, basil. It is one of the most commonly used herbs next to parsley and oregano. Its aroma and flavor is strong, sweet and fresh making the perfect compliment in heavy pasta dishes. Basil has a deep history spanning 4,000+ years. Scholars seem to think it originated in India and travelled to the Middle East, first being recorded in ancient Egypt, and eventually on to Europe.

Thai basil
In India it was highly regarded and was used to swear oaths upon along with often being planted along temple walls and being laid out with the dead due to the protectant.

lemon basil
To the ancient Greeks, the word for basil, basileus, means king and there is a myth associated with the herb and a mythical creature with the head of a rooster and body of a dragon, Basilisk, and basil was the cure for its lethal bites.

purple basil
Basil was originally associated with Mediterranean food and Indian food but is now more considered an Italian and Thai herb.
There are quite a few different varieties of basil, 31 to be exact. The most common basils used in modern times are sweet basil and Thai basil.
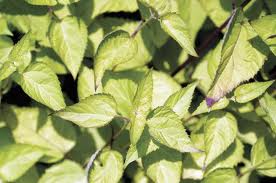
camphor basil
The main medicinal use for basil is as an anti-inflammatory and traditionally used for arthritis. Naturopathic doctors prescribe basil to treat diabetes, allergies, impotence, respiratory problems, and infertility. Basil is also high in antioxidants, has antibacterial properties, and basil is great for the immune system.

Today’s recipe will be an easy pesto sauce. Pair it with pizza, pasta, rice and any meat or seafood. It is fresh and simple, perfect for summer evenings!!

Simple Pesto
1/4c walnuts or pine nuts
4cloves of garlic, peeled
1 ½c fresh basil
1/2c olive oil
1pinch of nutmeg
1/4c grated parmesan cheese
salt and pepper to taste
Process all ingredients in a food processor until a coarse paste is formed or use a motar and pestle. Mix in grated parmesan last. Enjoy!!

Edible Flowers
I am taking a break from my herb series today. I just took my dog for a walk and was enjoying all the blooming flowers today and thought edible flowers would be fun to explore. The definition of edible flowers is a lot wider than I thought that include many commonplace flowers that are all around you daily.
Edible flowers can be used for decoration, I have used plenty of edible flowers in my plating at work; they look so elegant (except for those WAY over-used damn purple edible orchids that EVERY sushi bar seems to use to death) and the fragrant ones can be used as an aromatic. They look gorgeous in salads or on any dish really. Especially in the summer!

They can also be added to sauces or dressings but can be easily ruined by becoming mushy, wilted, or drowned out and lost. The best way to add flowers to your dish is to add them as close to the end of preparation and close to serving as possible. Edible flowers are also great candied, made into jellies or syrups.

The use of flowers in food dates back to mid 100’s B.C.
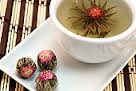
They were transported in ancient times with the same care as valuable spices. Ancient Romans, Greeks and Chinese recommended edible flowers (Romans and Greeks used mallow, rose and violets) for medicinal purposes while around the same time the Incas, Aztecs, and Hindus used flowers for religious rituals. Medieval monks used calendula in their cooking and preserved violets by turning them into sweet syrup. Edible flowers in general are thought to be cleansing for the body and are also used in teas. You should watch a jasmine tea flower open sometime in your teacup filled with hot water. It is gorgeous! Bea balm tea was used instead of black tea during the Boston Tea party of 1773 and Victorians and Edwardians candied violets and borage to decorate cakes and sweets.
Some edible flowers can be quite inexpensive and could be picked straight out of your own backyard, like dandelions (whether you want them there or not!) while some are very expensive and highly prized like saffron.

Here is a short list of some edible flowers to get your imagination going!

Calendula
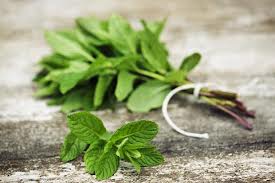
Mint

Carnation
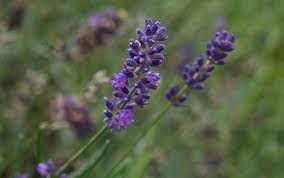
Lavender

Basil

Apple

Japanese Honeysuckle

Jasmine
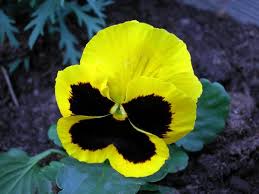
Pansy

Okra

Lilac

Violet


Chrysanthemum

Daisy

Tulip

Chinese Hibiscus

Marigold

Cannabis

I have also included a recipe for candied rose petals (they are just so pretty) and rose water.
Rose water is great for everything from using it as a diuretic and detoxing agent. The healthy water also contains Vitamins A, C, D, E and B! It is considered a mood-enhancer and helps with depression. It can also be used as an antibacterial, an anti-inflammatory and ease symptoms of eczema and psoriasis. More uses for rose water include using it for pain, decongesting sinuses and asthma, menstrual disorders, scalp issues, bug bites and diarrhea.
It is also used as a relaxant (bath time!) and used in many soaps, and lotions cleaning solutions. Culinary uses can be drinks, savory dishes (film fans: Like Water For Chocolate, remember the rose petal sauce?), deserts, puddings, cakes and even curries. The possibilities are endless!!!!

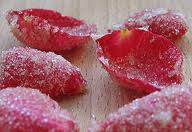
Candied Rose Petals
2 ORGANIC roses, petals removed
1 large egg white only, lightly beaten OR simple syrup ( 2parts sugar, 1 part water. Boil to dissolve sugar while stirring constantly. Remove from heat as soon as sugar dissolves)
1/2c sugar
Line a baking sheet with wax paper or a silpad. Brush both side of every rose petal with the egg white and dip them in the sugar immediately after. Let them dry on the lined baking sheet. Use them for decoration or eat them alone for teatime!
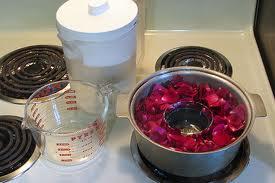
Rose Water
Clean ORGANIC rose petals or herbs
Water
Ice
Place a heavy glass ramekin into a deep stockpot. Fill the ramekin 3/4 full with water to weigh it down. Place rose petals or herbs around the exterior of the ramekin in the bottom of the pot and cover with water halfway up the side of the ramekin. Place a shallow soup bowl on top of the ramekin. Bring the water and rose petals to a boil. Lower heat to simmer.
Place a stainless steel bowl on top of the stockpot. It should be large enough to seal the pot, but shallow enough so that its bottom is above the top level of the soup bowl. Fill the top bowl with ice.

Simmer the mixture 3 to 4 hours, depending on the amount. As the mixture boils, the heat rises and hits the cold bowl, causing it to condense and drip down into the inner bowl. Replace ice as needed as it melts.

When done, the small bowl will contain the rose. It will have a layer of rose oil that is the essential oil or extract. The oil may be separated from the water. You can separate the oil and water if you choose by using a separatory funnel, it’s a teardrop shaped container with a stopcock at the bottom used mainly for scientific purposes. You can use this method with any herb or flower, go crazy! Let me know what you make!

Enjoy!
Photos compliments of Getty Images
Herbs Part 3
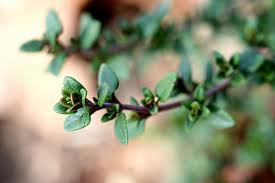
Thyme
Thyme. What can I say about it other than we all don’t have enough of it! Haha, I feel like a bit of nerdy culinary humor today! Seriously though, thyme is necessary in many dishes. It is native from the Mediterranean region and was brought to the rest of Europe via the ancient Roman civilization. They also used it to cure shyness or depression and was a given to warriors before battle to boost bravery.

Other interesting ancient facts about thyme are that thyme gets it’s name from the Greek word thymon or thumos (meaning spritedness or another meaning is to fumigate) and the fragrant herb was originally used as incense or as a fumigator during animal sacrifices in ancient Greek culture. It was also a compliment to say someone smelled of fresh thyme. Greeks also used it to flavor honey (and it is still made today on Mount Hymettus in the ancient method!) and also used the herb to flavor wine and fruit. Ancient Egyptians used thyme oil in their embalming process and in ancient England you could drink a brew made in part of thyme to see fairies. In medieval-time Wales, thyme was planted on graves (to ensure safe travel to the next life) and patches of wild thyme were known for harboring fairies.

Health benefits of thyme are as ancient as the herb itself. Traditionally thyme was used to cure nightmares. It was later recommended in tea form to relieve headaches and hangovers by Carl Linneaus, the founder of the modern botanical nomenclature system and in 1719, a German apothecary found that thyme oil could be used as a natural fungicide. It has also been found that thyme has disinfecting properties and can combat the whooping cough in syrup form. It also can be inhaled to treat septic sore throats and topically treat psoriasis and eczema.

Thyme in culinary use is just as varied and rich with history. It can be bought fresh or dried and is known to be a strong and aromatic herb. Thyme is the best at retaining its flavor out of all the herbs when dried. It is used in Middle Eastern foods such as zatar (an herb and seed mix that is a staple in the cuisine). Thyme is also used in French cuisine, like the bouquet garni, a collection of herb tied with cooking twine or made into a sachet with cheesecloth that is traditionally 2 sprigs of thyme, 3 sprigs of parsley and 1 bay leaf dried or fresh.

There are many different species of thyme. Some are used for culinary uses and some are used for decoration only. The most common thyme is usually called English thyme, French thyme, summer thyme, winter thyme or common thyme. Other culinary thymes are lemon thyme, orange thyme, lime thyme and caraway thyme. Non-culinary thymes include mother of thyme, wild thyme, wooly thyme, and creeping thyme (which is an important nectar source for honeybees).

Today’s recipe will be the above mentioned zatar mix. I fell in love with it living in the Middle East and I get excited whenever I get to indulge in it. I usually had it heavily sprinkled over olive oil-brushed flat bread alone or with labne (a thick Middle Eastern salted yogurt spread, there is a photo of it at the bottom of the page!) slathered on top. It is a taste that is so unique and addicting, I am sure most of you out there will fall in love with it if you are not already! You may have to go to a Middle Eastern market for some of the herbs, but it will be worth it!

Zatar herb and seed mix
1/4c sumac
2Tbls dried thyme
1Tbls roasted white sesame seeds
2Tbls dried marjoram
2Tbls dried oregano
1tsp coarse salt
Grind sesame seeds in a food processor or with a motar and pestle. Add remaining ingredients and mix well. Store in an airtight container in a cool and dark place. You can use it for up to 6 months depending on how well you store it. If you want you can add some cumin or fennel seed or coriander to change it up a little. Some cultures add caraway seeds. You can spread it over oven-toasted flatbread (brush with olive oil first); sprinkle over salads, pizza or pasta dishes. Use your imagination and go crazy!

Enjoy!!
photos compliments of Getty images

Herbs 2:
Rosemary
Rosemary is one of my favorite herbs. I love its heavy aroma and interesting history. Rosemary is a member of the mint family and is native to the Mediterranean region usually growing near the ocean. It is an evergreen shrub (the leaves resemble pine needles) and can grow up to 6 feet tall, but they are usually around 3 feet tall and bushy.

There have been a wide variety of uses for rosemary over the centuries. Since Medieval times and through till Victorian times, rosemary was used for weddings in decoration and adornment. It symbolized fidelity, love, friendship and the life of the bride before marriage. Anne of Cleves, one of King Henry VIII’s many wives, wore it as a wreath dipped in scented water on her wedding day.

It has also been thrown into graves as a symbol of remembrance, a nightmare and witch repellent, stuffed into dolls to attract lovers or curative vibrations, a love-divinatory instrument, and turned into a symbol that the woman ruled the house. Men would rip up rosemary bushes growing in their gardens as a sign that it was they, not their wives that ruled the house.

Rosemary has also been used (and some still use it today) for medicinal purposes. Traditionally used in a tincture of alcohol and rosemary to treat gout and help renovate vitality of paralyzed limbs. It became the first ever European perfume called Hungary water because it was first made for a Queen of Hungary, the exact date of invention is lost to history. It has been used for improving memory and a study had shown memory improvement when the scent was pumped into the air of office cubicles in an experiment. Rosemary has a number of potentially biologically active compounds including two antioxidants.

Rosemary has a strong aroma and its culinary uses are many. You can use rosemary in everything from dry rubs and marinades to stews and sweets.

To hopefully inspire you, I am writing down a recipe to make rosemary oil. There are many uses for this oil in marinades, salads, and soups. You could also use it to garnish meat and seafood dishes or just dip a nice piece of bread in it. Put in nice bottles, rosemary oil can also be given as nice gifts!

Rosemary Oil
Start with 5 sprigs of rosemary for every liter of oil; add more if needed depending on how strong you want the oil to be.

Warm a less strongly flavored oil (like safflower or sunflower oil, but you can use olive oil as well!) up on the stove over low heat. You do not want it even near a simmer, really just warmed up a bit. Meanwhile, wash the rosemary with water and dry gently with a paper towel. Place the rosemary in the glass jar or bottle of your choice. Pour the warm oil over the herb and seal the jar/bottle tightly. Store it in a cool, dark place like a pantry or cupboard for about 2 weeks to let the oil and herb infuse. Taste and add more rosemary depending on how strong you want the oil to taste. If you need to add more rosemary, add it and store it again for another week and taste it again then.
Tip: If you are using a monounsaturated oil like olive oil or peanut oil. These infused oils should be refrigerated in case of botulism. Use all oils within 2 months. You can also add garlic or chili peppers to the oil to give it more depth.
Enjoy!!
Photos courtesy of Getty images

Herbs 1:
Parsley and Parsley tea

My good friend Steve had a little article on his FB page about health benefits of parsley tea. I thought that was an interesting topic to blog about, also herbs in general. So the first blog in my herbs series will be on parsley, specifically parsley tea. Read on!

Parsley is an herb used in many dishes as garnish (think 90’s pasta dishes with chopped parsley garnishing the rim of the plate) or in salads. Parsley is also used as an aromatic flavor enhancer for many soups, stocks, marinades, etc. They can also be eaten to freshen your breath and have been traditionally used by some religions in their ceremonies.

Parsley is of the same family as carrots and celery, there is even root parsley that is grown in Central Europe called the Hamburg root parsley. There are also different strains of leaf parsley flat-leafed parsley, curly-leafed parsley and a third mainly grown in southern Italy; it has a thick celery-like stalk.

This herb, like most herbs, has many health benefits. Parsley is a good source of antioxidants, folic acid, vitamin A and C, boosting immune systems, detoxing, and inducing a woman’s period (it is not safe in large amounts for pregnant women or women looking to get pregnant). It can also be used as an anti-inflammatory and have heard it can reduce excess sodium in your body.

Even with all of these health benefits, too much parsley can cause kidney stones in some people or cause kidney and liver problems. A safe amount to ingest per day would be (in tea form) 1 cup per day.
Parsley tea is a great way to get the benefits from this dynamic herb. Please just be cautious in how much you ingest.
Here is a recipe for fresh parsley tea; you can add honey to sweeten the tea. Enjoy!

Fresh Parsley Tea, drink cold or hot
1 bunch of flat leafed or curly leafed parsley, roughly chopped
5-7c drinking water
Bring water to a boil on high. Add parsley and take off heat to steep for 3-4 minutes. Strain into a pitcher and keep in the refrigerator for up to 5 days. Drink 1 cup a day and enjoy!
If you want to make a one-cup hot tea, heat up chilled tea in a small saucepan on medium heat until desired temperature.
photos courtesy of Getty images

France part 2
So here is part two of my France blog!!
Fashion and French food are not the only thing happening in Paris. We had a couple great dinners that are not classically French, but just as delicious!

Turkish food in Paris is fresh and a great late night dine, especially since most restaurants close around 10:30pm for food and turn into more of the bar/café scene. We were in Paris for a convention and by the time we got out of the convention, most of the places to eat around our hotel were long-closed for food. We happened to come across this Turkish spot on one of the main streets near where we were staying. Granted we were staying out in the 16th district, far from the center of Paris, but that is where the convention was. So this Turkish place looked like your average kebob eatery, the vertical spit with the gyro meat temptingly spinning around, showing off its lovely meat for all to order. The guys working there were so nice. They seemed pleased to have such late night patrons, not put out as could be expected. I ordered the chicken shwarma plate. It was chicken gyro meat with rice, salad and French fries. Now it does not sound super exciting, but let me tell you, at 12:30 on a weeknight with nothing else around and starving- it hit the spot! Everything was super fresh, not oily or overcooked. It was the perfect way to end a hectic day.

The other non-French eatery that we made it to was a place owned and operated by a Japanese female chef. The concept is Japanese-Northern European fusion, and it works! We had a foie gras tataki that was what you would expect, delicate and rich. I ate for a main course marinated salmon sashimi over sushi rice. The food was great; atmosphere was simple yet trendy and service was friendly especially considering our poor French!
So in honor of fusion cooking and French cuisine, I will post for you a recipe for foie gras nigiri. It is the perfect marriage of Japanese and French ingredients and techniques.
Foie gras is fattened duck liver, either sautéed in slices or can be made into a terrine or pate. Historians say that ancient Egyptians were the first to practice overfeeding geese to enlarge the liver for eating. It has been a delicacy ever since, mainly used in French cuisine. It is now illegal in California as animal rights activists lobby against the practice of making foie gras, but I am not going to get political or dive into morals in this blog. This blog is simply about good food. It is not as difficult as you might think to prepare this meat product. Read on to find out how! This is a lengthy blog, so please stay with me and it will be worth it!

Foie Gras Nigiri with Yuzu and Blackberry Compote and Julienne Shiso Leaf
makes about 15-20 nigiri
Yuzu and Blackberry Compote and Julienne Shiso Leaf
1 tablespoon unsalted butter
4 Yuzu juice, Japanese lemon-like citrus you can find at some Asian markets
4 Whole yuzu peels, cut into small slices- about 1/8 inch thick
2 cups blackberries, rinsed
1/4 cup sugar
1/4 cup blackberry or raspberry liqueur
1/2 teaspoon ground ginger
1/2 teaspoon ground cinnamon
10 Shiso leaves, Julienne or thinly sliced
If you cannot find yuzu fresh, you can use yuzu marmalade or if you cannot find that, use 2 lemons
Heat the butter in a large sauté pan over high heat until melted and bubbly. Add the berries and yuzu peels and sauté for 2 minutes. Add the sugar, yuzu juice and liqueur and cook until the sugar dissolves, about 2 minutes. (Be careful: The liqueur may ignite. If it does, cool the berry mixture until the flames die down.) Add the ginger and cinnamon, mix well, and cook 2 to 3 minutes longer. Let cool for about 5 minutes. Spoon a little over the foie gras nigiri and garnish with shiso leaf.

Foie Gras
1 piece Foie gras; the whole liver, deveined and sliced ½ inch thick and about the length of the middle finger on your hand or as desired

First, find a high-quality foie gras at a gourmet market or food purveyor. It should look slightly shiny with NO bruising or discoloration. The color should be pale beige with pinkish tones. There should be no cyrstals on the package. That could mean it had gone frozen poorly or defrosted and refrozen without cooking which is a no-no. The texture should be firm, leaving no imprint or marks where it has been touched or handled. You can kkep foie gras in your freezer for usually 18-24 months in a vacuum-sealed freezer package, but keep note of the expiration date on the package. Defrost the foie gras in the refrigerator for as long as 24 hours before preparing it to cook.
Foie gras must be deveined before cooking. Let the piece sit out for about 5-7 minutes in room temperature to soften the texture. The veins are normally about 2 centimeters below the surface. Cut along the middle of the piece careful not to cut the veins. Dig with your fingers to find the vein, gently remove the layer above them and very gently pull the veins out.
Slice the piece into ½ inch thick pieces and slice those into desired nigiri length pieces, foie gras will shrink when cooking so keep that in mind! Dip the knife in hot water before you slice, you will end up with much prettier slices. You will need to cook and eat the foie gras within 2-3 days after defrosting, very important!
To cook, heat up the sautee pan over medium-high heat for about 5 minutes and carefully sear each slice of foie gras for about 30-35 seconds on each side. This will produce the cooking temperature of rare, which is optimum for enjoying. Cook each piece and place on top of rice ball. Top with compote and shiso leaf.
Sushi rice
1c Japanese rice
1/8c rice vinegar
4Tbls sugar
2Tbls salt
1 small piece konbu; about 3inch by 3 inch, wiped with a damp cloth
Wash the rice thoroughly until the water runs clear. Strain and add rice and 1c water to rice cooker. Place the konbu on top of the rice and turn on the rice cooker. If you do not have a rice cooker, cook the rice COVERED on high until it comes to a boil for 10 minutes and lower the heat to low for another 12. Leave covered the whole time, that is very important. After the 12 minutes, take off the heat and let the rice sit covered for another 10-12 minutes. While the rice is cooking, mix the rice vinegar, sugar and salt together and mix thoroughly. Immediately after the rice is finished cooking, pour the rice vinegar mixture over the rice via a rice paddle or wooden spoon, using the rice paddle or wooden spoon as a spout to spread the rice vinegar more evenly. Mix rice using a back and forth slicing action, do not turn the rice over too much as the rice will get mushy. Let cool and cover with a damp towel so the rice does not dry out.
Once cool, form small (about the size of a large marble) rice balls in the shape of a football. Make the balls firm but not like a rock, the rice should stay in the shape but fall apart in the mouth. Place each piece of cooked foie gras on top of the rice ball, place gently on a platter and garnish with a little of the compote.

P.s. if you want to put a nori band (toasted seaweed for sushi cut into strips) around the nigiri, feel free. Just take a sheet of nori, cut in half and cut them into strips the short way. Put around the it in the center of the nigiri.

Enjoy!!
photos compliments of Getty images

France Part 1

Steak Au Proivre

I just came back from a week in France and so I had to write a blog about French cuisine and my experience this last week.
First of all I love France, viva la France! I love the fashion, the pulse of the city, and I love the French people- especially the new friends we met on our stay.
We ate at some pretty amazing places. The first night out we ate at a little spot across from our hotel. It was a bunch of us, so our ordering was eclectic. I had caprese salad and steak and frites. I loved the way they cut the potatoes at this spot, they looked like they had been scooped out of a potato in thick shavings.
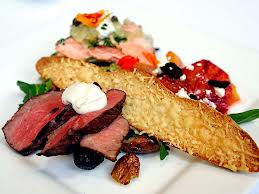
Another highlight of my culinary experience was this restaurant we went to called Chez Julien. The bunch of us had a private room upstairs. I had for a starter, a foie gras terrine with black truffles and fig compote. For main course I had steak au proivre, its filet mignon with a peppercorn sauce usually served with pomme frites, or shoestring fried potatoes…. Amazing! Dessert was an incredible crème brule with sautéed apples on the bottom. The dinner was relaxing and everyone had a great time, leaving with their cheeks flushed from French champagne and good food.
Today I will give you a recipe for steak au proivre, a staple of French eating. Steak au proivre is a classic French dish using usually filet mignon cuts of beef. The beef is crusted with roughly cracked black peppercorns and seared on a pan and finished in the oven for desired temperature. The sauce served with the steak is made using cognac reduced in the pan used to sear the steaks, and cream as a base. Shallots or djon mustard can be added to the sauce. An easy and delicious dinner for any occasion!

Steak Au Proivre with Pomme Frites

Steak Au Proivre
4 boneless beef filet steaks, about 3-4 inches thick
1 tablespoon kosher salt
2 tablespoons whole black peppercorns
1 tablespoon vegetable oil
1/3 cup finely chopped shallots
1/2 stick (1/4 cup) unsalted butter, cut into 4 pieces
1/2 cup Cognac or other brandy
3/4 cup heavy cream
Preheat oven to 200°F.
Pat steaks dry and season both sides with kosher salt.
Coarsely crush peppercorns in a sealed plastic bag with a meat pounder or bottom of a heavy skillet, then press pepper evenly onto both sides of steaks.
Heat a 12-inch heavy skillet (preferably cast-iron) over moderately high heat until hot, about 3 minutes, then add oil, swirling skillet, and sauté steaks in 2 batches, turning over once, about 6 minutes per batch for medium-rare.
Transfer steaks as cooked to a heatproof platter and keep warm in oven while making sauce.
Pour off fat from skillet, then add shallots and half of butter (2 tablespoons) to skillet and cook over moderately low heat, stirring and scraping up brown bits, until shallots are well-browned all over, 3 to 5 minutes.
Add Cognac (use caution; it may ignite) and boil, stirring, until liquid is reduced to a glaze, 2 to 3 minutes. Add cream and any meat juices accumulated on platter and boil sauce, stirring occasionally, until reduced by half, 3 to 5 minutes. Add remaining 2 tablespoons butter and cook over low heat, swirling skillet, until butter is incorporated. Serve sauce with steaks.

Pomme Frites
4-6 Baking potatoes cut into thin matchstick strips (About 1/4 wide and 1.5 inches long.)
1-2Tbls Potato starch
Peanut or vegetable oil for frying
Sea salt, to taste
Soak the potatoes for 10 minutes in cold water. Drain.
Dry potatoes in a salad spinner or with paper towels.
Toss potatoes with potato starch. (Available at most large markets and Asian groceries.) The potato starch changes the dynamics of frying in peanut oil as it provides a dry starch surface rather than a wet, potato starch surface.
Heat peanut oil to 350 degrees and fry using tongs to separate the potato strips.
When well browned, remove from the oil and drain on paper towels. (If your frying temperature was correct, there should be virtually no oil on the paper towels.)
Toss gently in a bowl with sea salt and serve warm.

Bon appetite!!!!
There will be more good eating stories in part two of my France blog….
